Photographing the northern lights is often a dream for landscape and nature photographers. These glowing curtains dancing across the sky offer breathtaking scenes, but they can also be difficult to capture. Between low light, freezing temperatures, unpredictable weather and sometimes tricky camera settings, it’s easy to come home with blurry, noisy images that look nothing like what you experienced with your own eyes (I’ve been there… and still am sometimes).
After spending several winters photographing the northern lights in Iceland, Norway, Finland and even France, I’ve learned that successful aurora photos rely just as much on preparation as on technique. Choosing the right gear, understanding your camera settings and adapting to real conditions in the field make all the difference.
In this complete guide, I’ll explain how to photograph the northern lights step by step : what equipment to use, which camera settings to choose, how to compose your images and how to avoid the most common mistakes. If you’re looking for when, where and under what conditions to see the northern lights in Iceland, I’ll cover that in a dedicated article. For now, let’s focus on the essentials so you can turn this magical moment into successful photos, and above all, images that stay true to what you felt on location.

Understanding the northern lights before photographing them
Before talking about camera settings, gear or composition, it’s essential to understand what the northern lights actually are. A lot of disappointment comes from unrealistic expectations shaped by social media photos : people expect incredible auroras visible all night long, without waiting or moving. Reality is a bit different 🙂
🌍 Northern lights (aurora borealis) appear mainly near the arctic circle, in places like Iceland, Norway, Sweden, Finland, Greenland or northern Canada. They are visible only at night, when the sky is dark enough, generally between September and March in the northern hemisphere.
🌏 Southern Lights (aurora australis) occur in the southern hemisphere, in countries like New Zealand, Australia, South Africa or Argentina, usually between March and September. In this guide, we’ll focus on northern lights, as I haven’t seen them in the south yet.
Auroras form when charged particles emitted by the sun collide with earth’s atmosphere, guided by the planet’s magnetic field toward the poles. This area is called the auroral oval and it’s where the majority of auroras occur.
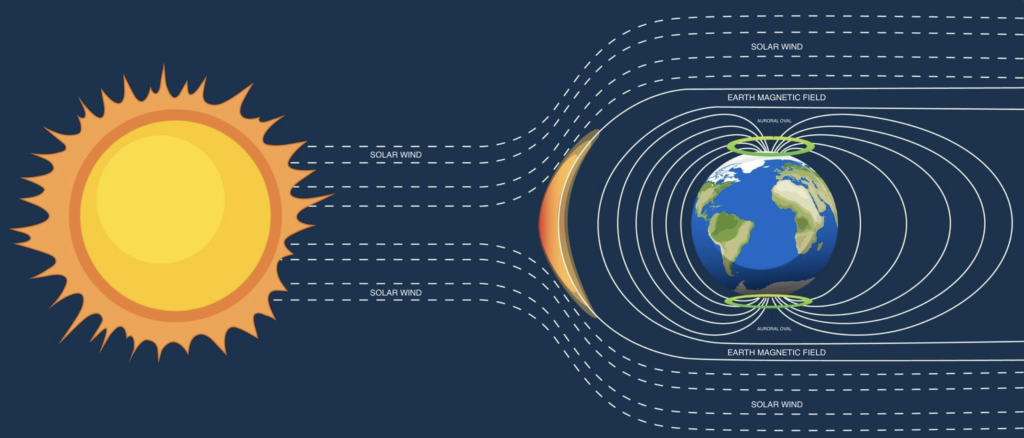
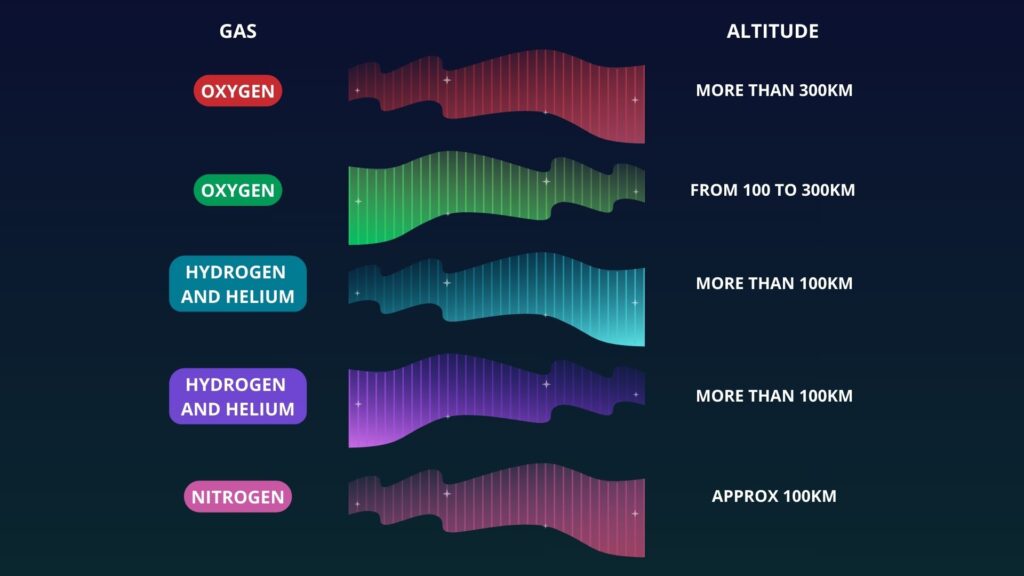
When these particles enter the atmosphere, they collide with oxygen and nitrogen atoms. Depending on the altitude, density and the quantity of energy encountered, different colors can appear :
- Green : the most common color, caused by collisions with oxygen.
- Purple : purple auroras are less frequent but are visible from time to time, especially during strong solar storms. This color is the result of interactions between hydrogen and helium.
- Pink : quite rare because they appear when the particules interact with nitrogen at low altitudes.
- Dark red : they usually appear at the upper or lower edge of an aurora. This color is caused by oxygen at very high altitude.
- Blue : these are the rarest and are hard to see with the naked eye. ce sont les plus rares car difficiles de les voir à l’oeil nu sur le noir du ciel. They usually occur when particles collide with hydrogen and helium molecules.
Believe it or not, not all auroras look exactly the same 😌 That’s what makes them so fascinating and beautiful. They vary in speed, shape and color. We’ve covered colors above, now let’s look at five different aurora shapes :
The auroral arch, the most common
This is the simplest aurora form and the one you’ll almost always see at the beginning of the show (let’s say 99% of the time). It’s a large luminous band stretching from east to west, usually appearing towards the north. These auroras are generally quite slow because they are stable and can remain visible from several minutes to several hours.
They’re perfect for testing your settings or refining your composition. You’ll also see them again after a strong aurora that has faded, when the sky calms down. This is usually a sign that the show is about to start again, so keep your camera ready 😉

Bands, draperies and pillars
I’ll group these three shapes together. When activity intensifies, the auroral arc can transform into bands that wave side by side, a luminous drapery that looks like a curtain of light, or pillars, which appear as vertical lines ascending up into the sky. These three forms usually move quite from slow+ to quickly. They are among the most spectacular auroras to observe (I absolutely love them), but also among the most difficult to photograph, as the movement is often fast and unpredictable. Multiple colors are often visible, ranging from green to red.


The corona, the most exciting moment
The corona is in my opinion the most intense moment of an aurora. Everything explodes in every direction, you often don’t know what to do anymore, your brain freezes and you feel a mix of panic and excitement.
It’s the absolute most impressive and rarest aurora form to observe 🥹 It occurs when the aurora develops directly above your head, creating the impression that all the pillars converge toward a central point. Visually, it’s an absolute shock, but you need to be ready, because it often happens extremely fast. A wide-angle lens is strongly recommended, and don’t hesitate to frame very wide to avoid missing anything.
Auroral corona photographed in Norway above a farm on Andøya Island, October 2024. 1.6″, f/1.8, ISO 2500
The veil
The auroral veil is a more diffuse form, sometimes subtle, where the sky appears slightly tinted green, pink or purple, without any clearly defined structure. To the naked eye, these auroras may seem weak or even invisible, but your camera will reveal the colors much better. They usually appear after a corona or strong auroral activity.
Veil-shaped aurora photographed at Budakirkja in Iceland, October 2025. 2.5″, f/1.8, ISO 6400

The pulsating auroras
Rarer and less well-known, pulsating auroras appear as luminous areas that turn on and off in pulses. They are very strange to observe, I even thought I had messed up my timelapse when reviewing it on location, but when I looked up at the sky, I clearly saw them “blinking.”
Charged particles can enter the magnetosphere in a stable way (a continuous and regular flow, producing dancing auroras) or in an unstable way, arriving in waves, which creates pulsating auroras. They are often visible later in the night or toward the end of auroral activity. They’re more difficult to photograph because they’re ephemeral, but I find them absolutely beautiful to observe.
Can you really predict northern lights ?
The short answer is : yes… and no. You can’t predict the northern lights with absolute certainty the way you would predict a solar eclipse. However, it is possible to estimate the probability of seeing auroras 2 to 3 days in advance, thanks to several solar and geomagnetic indicators. We’re not Nostradamus, but we’re doing pretty well ! Once the auroral activity has started, it’s possible to predict between 30 minutes to 1 hour in advance how the show is going to happen thanks to a few tools.
Forecasting tools are based on solar activity, particularly solar wind and coronal mass ejections. Websites like NOAA or SpaceWeatherLive provide very reliable data, although they can sometimes be a bit complex to read. These datasets are used by aurora photographers and chasers all over the world. You can also rely on various apps such as Hello Aurora or My Aurora Forecast, which offer simpler yet still reliable data. These are apps and websites I personally use when chasing auroras, and you can download them without hesitation.
When reading these apps, don’t just look at the KP index. The KP index measures the magnitude of geomagnetic storms, on a scale from 0 to 9 (0 being the lowest, 9 the highest). It’s often said, in a very basic way, that the higher the KP, the better the chances of seeing auroras. But KP is not the only parameter to consider. So if an app only shows the KP index… you can uninstall it right away 🙂
👉 Pro tip : I always check live webcams (via apps or Instagram stories) to see what’s happening further east in the world (Finland, Sweden, Russia). If auroras are visible there and the sky is clear, there’s a good chance they’ll reach western regions shortly after.

The best solar and weather conditions for photographing the northern lights
Contrary to what many people think, photographing the northern lights does not depend on a single factor. It’s a combination of solar activity and local weather conditions. And this is where many people misunderstand the KP index : High KP ≠ guaranteed auroras.
KP is a global indicator that gives a general trend, but on its own, it’s absolutely not enough to determine whether you’ll see and photograph auroras. To truly understand what’s happening in the sky, you need to look at several parameters together. They may seem intimidating at first, but once you understand their logic, reading auroral activity becomes much easier (I promise) :
Solar wind speed
Solar wind speed indicates how fast charged particles emitted by the sun are traveling toward earth. The faster the solar wind, the more intense and widespread the auroras tend to be :
- Less than 400 km/s : low activity
- Between 400 and 500 km/s : moderate activity, good chances for auroras
- Between 500 and 600km/s : dynamic and bright auroras, from 500km/s it’s great
- Above 600 km/s : jackpot, very intense activity.

Solar wind density
Density corresponds to the number of solar particles reaching Earth. The higher the density, the better : auroras will be more intense and less “pale” or transparent. To give you an idea :
- Less than 5 particles/cm³ : low density, weak auroras
- Between 5 and 10 particles/cm³ : average conditions, auroras possible
- Between 10 and 20 particles/cm³ : good density, auroras can be more intense
- More than 20 particles/cm³ : strong density, risk of solar storm
👉 The combination of high density (+10 particles/cm³) and a high solar wind speed (+500km/s) often offers spectacular auroras.

The Bz (most important parameter)
If there’s only one parameter you should remember, it’s this one. Bz determines if the solar wind can actually enter earth’s magnetosphere. In simple terms: whether solar particles reach us or not (and for what we want to see… it’s better if they do) :
- Positive Bz (above 0 nT) : it’s bad, low chance of auroras
- Bz close to 0 nT : neutral conditions, auroras possible
- Negative Bz (below -5 nT) : very good sign, it favors auroras
- Bz below -10 nT : ideal conditions, strong auroral activity possible
👉 The key is to have a negative BZ, ideally below -5nT.

The Bt
Bt represents the strength of interactions between the solar wind and Earth’s magnetosphere :
- Bt below 5 nT : weak, limited auroral activity
- Bt between 5 and 10 nT : moderate conditions, auroras possible
- Bt between and 10 nT : strong activity, likely intense auroras
- Bt above 20 nT : exceptional conditions
👉 The most important is to have a Bt superior to 10nT to get nice auroras.
👉 If the Bz suddenly drops, (for example from +2 to -7) while Bt remains stable (around 10–15 nT), keep your eyes open, auroras often appear within minutes or the following hour.

Ideal solar conditions to see northern lights
Okay, Bz, Bt, speed… It almsot sounds like you need a degree in astrophysics just to see green lights in the sky 😂 Not at all ! It comes gradually and naturally by looking the graphs nigth after night. When you experience an aurora exploding above your head, take a screenshot of the data and analyze it later to understand what happened. This helps you “predict” future nights more effectively. To sum up ideal conditions :
- Solar wind speed : +500 km/s
- Solar wind density : +10 particles/cm³
- Negative Bz : below -5 nT
- High Bt : above 10 nT
👉 In short, a moderate KP (3-4) with a negative Bz and a good density can give spectacular auroras, while a high KP (7-8) with a positive Bz and low density may produce absolutely nothing. Speaking of real life experience here : at first I was just blindly following the KP index and complaining I didn’t see anything. When I started actually reading charts I realized KP wasn’t worth worshipping and had some very great nights with auroras from midnight until 6AM, with just KP2. It’s worth learning to read four small graphs trust me!
Ideal weather conditions to see northern lights
Another thing to mention is of course the weather. Sounds obvious but even if solar activity is perfect, local weather matters. Without clear skies, there’s no aurora observation and certainly no photography.
- Clouds : a clear sky with weak auroras is better than intense auroras hidden behind clouds. Clouds are your number one enemy. Use local weather apps to check cloud coverage (Norway : Yr.no, Iceland : vedur.is, etc.).
- Wind : moderate wind can clear clouds (yes !), but strong wind makes shooting difficult. Your tripod becomes unstable, you get colder, and long exposures can be blurry. Attach your camera bag to your tripod to add weight and layer up.
- Temperature : cold weather often means clearer skies and drier air. It’s not a direct aurora factor, but it’s generally favorable.
- Moon : many people say the moon ruins aurora photography. I strongly disagree. The moon can illuminate your foreground and enhance auroras. We’ll come back to this later 😌


Why northern lights can be difficult to photograph
Seeing auroras on your phone while sitting comfortably on your couch is one thing. Seeing them in the field and photographing them properly is another. This is often where disappointment appears, especially during a first trip to nordic countries with the specific goal of seeing auroras.
First, you need to understand that auroras are generally less bright to the naked eye than in photos on Instagram. The human eye struggles to adapt to darkness, and auroras often appear as faint, white-ish shapes moving slowly.
👉 Your camera sensor, thanks to long exposures, captures colors you don’t see. If in doubt, always take a test photo with your phone. Weak auroras often show up clearly on camera but barely to the naked eye. Don’t despair, it is absolutely possible to see the vivid colors you see online, but it requires strong solar activity and a bit of luck. It’s possible, but not guaranteed.
Second, auroras don’t always appear where you are. They are unpredictable, can intensify within seconds, change shape and disappear just as quickly.
👉 Being flexible is the key. If capturing auroras is your top priority, you’ll need to monitor cloud-free zones on your weather app, accept driving a bit to find clear skies, and sometimes wait a long time for everything to align. Some nights offer continuous shows, others require hours of patience for just a few seconds of magic.
Third, weather conditions can be extremely frustrating. For example, during my October 2024 trip to Iceland, the first night at Stokksnes offered very strong auroral activity but also thick cloud cover. Impossible to photograph anything. The second night had perfectly clear skies, but only faint auroral arcs.
👉 Both nights had potential, but neither was ideal for a truly epic photo. That’s the kind of situation you have to accept, hoping that one day you’ll come back with better luck.
Finally, we need to talk about unrealistic expectations, something I see all the time in social media comments. “Auroras aren’t that bright, it’s impossible” “Nah they don’t move that fast, it’s AI”… Remember that’s the Instagram effect, where people only post their best shots, not the many average or failed attempts.
👉 Spectacular aurora images you see are spectacular for a reason : high-quality gear, near perfect conditions and many nights of attempts. A first aurora-focused trip can quickly become frustrating if you expect a constant show and the sky doesn’t cooperate. Aurora photography requires patience, adaptability and a solid understanding of conditions, and don’t forget that luck plays a huge role. It happened to me in Norway where I was desperate on the first half of the trip to see northern lights. Weather was shit (let’s be honest) and data weren’t good. But the second half gave me 4 amazing nights, a great reminder that you can’t control nature and have to deal with what she offers !

Essential gear to photograph the northern lights
Good news : you don’t need the latest 5000€ camera to photograph auroras. You can even photograph them with your phone ! That said, certain gear choices make things much easier, especially in cold, windy and dark conditions. If you want to see my full gear list, I’ve written a dedicated article about it. For now, let’s prepare the ideal camera bag for aurora chasing.
Which camera to use for northern lights ?
The eternal debate : DSLR or mirrorless… In reality, both work and it doesn’t matter. The key is being able to shoot in manual mode, control ISO and shutter speed and shoot in RAW. Mirrorless cameras have a slight advantage with better high-ISO performance and lighter weight, but honestly weight doesn’t matter much when shooting auroras 🙂 The most important elements are :
- a full frame sensor : better noise handling
- a good ISO performance : usable between 3200 and 6400une montée en ISO correcte
👉 A recent APS-C camera will also work perfectly fine. In my opinion the most annoying cameras for night photography are compact cameras or bridge cameras, where manual control is limited. In all cases, your lens and your mastery of your camera matter more than the body itself. A less powerful camera with good settings will always outperform a top-tier camera with poor settings.
Which lens is ideal for aurora photography ?
Your lens is the key element for successful aurora photos. You should prioritize a fast wide-angle lens.
👉 Wide-angle : because auroras often cover a large part of the sky and move quickly. A wide frame lets you include both foreground and auroras. Ideally choose a lens between 14mm to 24mm (full frame) and 10mm to 16mm (APS-C).
👉 Fast : because a wide aperture lets in more light, allowing shorter exposures and lower ISO (less noise). Ideally choose a lens with an aperture between f/1.4 and f/2.8. Beyond f/3.5, it will start to be complicated and beyond f/4, almost impossible.
A list of popular lenses for astrophography : Sigma 14mm f/1.8 (the one I have and would never part with), 24mm f/1.4, 14-24mm f/2.8, 16-35mm f/2.8. There are many others depending on your camera brand, this list is just to help you get oriented.

Tripods, batteries and essential accessories
Aurora photography always means night, often cold, wind and snow. Some accessories are absolutely essential, for technical success, your comfort and to avoid frustration. I never leave without :
- A sturdy tripod : I have the Leofoto Ranger LS-324C and it’s the perfect balance of weight, wind resistance and stability. Always choose a robust tripod with a solid head and ideally a hook to weigh it down with your bag. A tripod that’s too light can vibrate with the wind and can ruin your photos sharpness.
- Extra batteries : cold drains batteries fast, even faster with timelapses. Bring at least 2-3 fully charged batteries and keep them in an inner pocket close to your body so they stay at a good temperature.
- A headlamp : I have the Bindi from Petzl, it’s 35g and it’s perfect ! It lets you adjust settings and move safely around your tripod. Tripping over your tripod during peak auroras is… not ideal. True story 😌
- A remote or self-timer : to avoid vibrations
- Microfiber cloth : to wipe moisture from your lens.
👉 Comfort bonus : hand warmers in gloves or pockets to keep hands and batteries warm. I’ve tested many and these are the best hand warmers I found. They last nearly 12 hours, an absolute game changer during long sessions. Snacks and a hot drink can also save your night 😌
👉 End-of-session tip : if it’s extremely cold and your gear has frozen, don’t place it directly under heat. Leave it in your bag or a cool area first to avoid condensation. Lived experience in Finland at -20°C : my lens needed slow warming before going indoors, so I let it in my bag outside, camera wrapped in a towel, for a few hours to let it defrost slowly.
Camera settings for auroras (step by step)
You’ve packed your bag, reached your spot, conditions are great, set up the tripod, and now you’re facing the sky. Okay… what’s next ? Here’s exactly what I do every time :
1. Switch to manual mode
Aurora photography (and astrophotography in general) is always done in manual mode. Auto or semi-auto modes can’t handle extreme darkness, contrast and rapidly changing light.
2. Check the aperture
Use the widest aperture possible. The smaller f-number, the more light will reach your sensor. The aperture allows to capture more light, reduce exposure and ISO and fix the aurora shape. Ideal aperture is between f/1.4 to f/2.8. Beyond, it starts to be difficult to capture auroras.
3. Set your focus
This is the biggest trap you can fall into, especially at the beginning. You must ALWAYS switch to manual focus. You can then either focus on a very bright star and immediately check sharpness on your photo afterward. Some lenses have an ∞ symbol on the focus ring : you just need to align this symbol with the small white mark. In all cases, remember to check your focus right away. A missed focus = an unusable photo.
4. Find your balance for ISO
It’s night, so you will need to increase your ISO. The goal is to preserve details and colors without introducing too much noise. A small amount of noise can be corrected in post-production, but a heavily underexposed photo is much harder to fix. Choose ISO values between 800 and 2500 if the auroras are very bright, and between 2500 and 6400 if the auroras are weaker. This will clearly depend on your camera’s capacities, so it’s important to know from which ISO value your camera starts producing noise that can’t be recovered.
5. Set your shutter speed
In my opinion, this is the most “delicate” setting, since it depends on the speed of the auroras and there’s no way to calculate it precisely. Over time, you’ll gain more experience and be able to “judge” an aurora’s speed and the settings to apply simply by looking up at the sky. Until then, you can rely on the following guidelines :
- 0,2 to 3 seconds : fast-moving auroras
- 4 to 6 seconds : very slow auroras
- beyond 6 seconds : shapes become smoothed out and the sky turns into a large green blur
The faster the aurora, the shorter the exposure time needs to be to preserve as much detail and motion as possible. The best approach is to test several shots using three different exposure times : if the aurora looks too “smooth”, shorten the exposure time. If not, lengthen it.
6. Additional tips
👉 File format : ALWAYS shoot in RAW. You’ll get better dynamic range, be able to recover highlights, fine-tune exposure and colors, and fix a potential white balance mistake.
👉 White balance : it doesn’t really matter since you’re shooting in RAW 😉 You can leave it set to Daylight, Auto, or manually adjust it to 4000K (which is what I do). This is purely an artistic choice between warmer or cooler tones, so it’s up to you when reviewing your photos on screen. Just one small note : if you’re preparing a timelapse, don’t leave white balance on “Auto”, as color shifts can occur and it’s a nightmare to fix afterwards. Set it manually to Daylight or the Kelvin value of your choice.

👉 In summary, here are the basic settings to get started :
- Format : RAW
- Mode : Manual (M)
- Aperture : f/1.4 to f/2.8 (as wide as possible)
- ISO : between 800 and 6400 depending on brightness
- Exposure : between 0.5 and 6 seconds depending on aurora speed
- Focus : manual, set to infinity or on a star
- White balance : daylight, auto or Kelvin of your choice
Auroras in Finland in Valtavaara Park. 1.6″, f/1.8, ISO 3200.
Composing your northern lights photos
You will find plenty of articles explaining how to set up your camera to photograph the northern lights (I didn’t invent anything). But in my opinion, a good aurora photo isn’t just about ISO and shutter speed. Technical knowledge is important, but as a landscape photographer, I believe composition is the foundation of a successful photo, and northern lights photography is no exception. A beautiful foreground makes all the difference between a “nice” photo and an “incredible” one. Why limit yourself to just the sky when you can include a waterfall, a mountain, or a person?
Composition starts by scouting locations in advance
For night photography, pure improvisation rarely pays off. Scouting locations during the day, or even from home, is a huge advantage and will save you valuable time when chasing auroras. When scouting a spot, remember to :
- Check the orientation of your foreground (east, west, north, south) : theoretically, auroras appear to the north/east/west. The south is rarer and usually happens during strong solar storms.
- Look for light pollution (near a city ? streetlights ?) : light pollution = mediocre conditions. However, it can sometimes be used intelligently to light your foreground. But if there are streetlights right above your subject, forget about it, they will overpower the auroras.
- Anticipate night access (parking ? hiking ? closing hours ?) : it’s obvious, but you need to know in advance whether a place is accessible at night. If nighttime access is forbidden, cross it off your list and move on to the next spot.
- Check if you can move 360° around your foreground : if auroras suddenly shift north and you don’t have time to go to another place, will you still be able to create a strong composition ? Favor locations where you can build multiple compositions around a single foreground.
I explain in detail where, how and when to see the northern lights in Iceland, as well as my 5 favorite spots, in a dedicated article.
Tools to help you scout locations
To help with scouting, you can use the following apps and tools :
- Google Maps / Google Earth : orientation, access and terrain. Use the “Street View” feature to see what the place looks like !
- Photopills: a paid app, but absolutely essential for planning photo sessions.
- Instagram and Pinterest : great for discovering new locations and getting inspired.
- My interactive Iceland map : I’ve listed more than 40 aurora photography locations, with all the useful info (access, orientation, light pollution, tips, etc). You just have to look at the spots around you and go ! No need to think or research for hours whether a location is good 😌

Always have a Plan B, in case clouds cover the portion of sky above the location you planned to photograph. For example, in the Lofoten in Norway, I had scouted several rorbuer in different places (less than 1 hour drive between each), which allowed me to stay flexible with cloud cover and successfully see auroras one evening.
Auroras in Norway above a rorbuer, seen through clouds. Streetlights illuminate the foreground. 0.8″, f/1.8, ISO 2500
Using a foreground to elevate your photos
Who doesn’t want to turn a “wow” photo into a “woooooow” photo ? Having a subject in your image gives scale, creates depth and tells a magical story. There are many interesting foregrounds no matter the country you go : waterfalls, mountains, trees, houses, people, lakes (reflections)… Almost anything can become a foreground. Think like you would for a daytime photo and use the rule of thirds to create balance in your final image.
👉 One small piece of advice : don’t hesitate to frame wider than necessary. It’s better to crop in post-production than to cut off a corona or an incredible aurora movement because the composition was too tight.
👉 Remember that the moon can also light your foreground. It’s often seen as an enemy in aurora photography, but I disagree. You just need to anticipate it during scouting : if it’s behind you, it will create shadows (tripod + you) ; if it lights the scene from the side, jackpot ! If it’s in front of the auroras, it can overpower them if they aren’t strong enough.

Editing your northern lights photos
Editing is a delicate subject because everyone has their own style and does whatever they want. I’ll simply explain what I personally do when editing aurora photos. There isn’t one single right way, but I like to keep my edits very close to reality.
Basic touches (Lightroom)


I always edit my photos in Lightroom Classic. I start by applying light noise reduction (around +35), then I adjust the white balance to restore natural tones without drifting into neon green or blue-green. The goal is to keep the result believable.
Then I add a bit of contrast and create masks to deepen the blacks in the sky and brighten the auroras. This adds punch to the sky and helps structure the aurora without crushing foreground details. I also create a sky mask to bring back some texture and sharpness.
Finally, I remove small distracting elements with the healing tool. When I’m on location, I try to remove branches, rocks, etc. directly, because I know it will save me time in post-production.
Natural before/after of auroras in Levi, Finland. 0.6″, f/2.8, ISO 6400.
This is just my opinion, but I think it’s important to keep realistic colors, respect the true intensity of the aurora, and avoid creating images that are impossible to see in real life. Everyone does what they want with their photos, but auroras are already magical by nature, there’s no need to oversaturate them. It reduces credibility and doesn’t reflect the emotion experienced. But again, everyone is free to do what they want 🙂
Common mistakes when photographing northern lights
Photographing northern lights isn’t necessarily easy. Even with good equipment and promising auroral activity, a single wrong setting, lack of anticipation or forgotten detail can result in disappointing images or no usable photos at all. It’s easy for me to say this because these are all mistakes I’ve made myself, especially during my first nights 😅 Between the cold, fatigue, excitement and the unpredictability of auroras, that’s a lot of parameters to manage and it’s quite easy to mess up. So here’s a list of the most common mistakes :
1. Shutter speed is too long
Auroras move, you start exposing and let your timelapse run… except your exposure time is set to 10 seconds and the auroras are moving fast. The result : the sky becomes a large greenish blur with no structure or texture. What looked spectacular to your eyes, with movement and beautiful colors, turns into a dull mess in the photo.
2. Poor focus
This one is classic and I still did it in October 2024 in Norway. Trying to move too fast, I had set an approximate focus without checking sharpness and let the timelapse run. Result : all my photos were blurry and unusable. A simple mistake of a few millimeters that ruined a photo session (but I still enjoyed the show with my eyes!.
3. Neglected composition
If you only capture the sky (I’m excluding cases where you’re pointing straight at the center of a corona), the image lacks an anchor to the earth. You end up with a photo that has little depth and a weak visual impact.
4. Lack of flexibility
Staying somewhere because you’re stubborn despite terrible conditions, like thick clouds or poor aurora orientation, is a waste of time. It’s completely counterproductive, so you might as well go to sleep if you’re not seeing or capturing anything. Knowing when to give up and move, even with the risk of not seeing auroras elsewhere, is part of the game.
5. ISO set too high
Out of fear of lacking light, you increase the ISO but you go a bit too far, and digital noise becomes impossible to fix in post-production. I made this mistake at Skógafoss (Iceland) in October 2025, pushing ISO up to 25,000. I honestly don’t know what happened over me, I guess tiredness from lack of sleep, excitement, cold, a bit of everything and I completely messed up my settings. It happens, but it’s the kind of thing you only realize afterward, once you’re calmly reviewing images on your computer. The disappointment was huge.
If you want to avoid these mistakes and many others, I’ve detailed everything with concrete examples, photos and practical solutions in a dedicated article : 10 mistakes to avoid when photographing the northern lights. I’ve also added a checklist at the end to keep on your phone, so you don’t forget anything before heading out to chase auroras and avoid common traps on the field.
Field advice after several winters chasing auroras
I would like to conclude this blogpost by saying that photographing the northern lights isn’t just about technique or gear. After several trips chasing them night after night, coming back with empty SD cards, waiting in the cold, sometimes being rewarded and sometimes not, I’ve learned that three things really make the difference.
Patience and resilience
Auroras can’t be ordered. Nature decides whether or not you’ll witness one of the most beautiful shows of your life that night. Some nights are magical, others aren’t. You have to accept that you’ll go out several nights, come back empty-handed, and try again the next evening. It’s frustrating, but if you only try one night between 8 and 9PM during your trip, the chances of seeing auroras are slim. You have to persevere, and the nights spent waiting for nothing will be completely erased by the ones when you finally see those beautiful lights.
Accept failure
What you don’t see on social media is failure. Nobody talks about it enough, nobody shows the hours of waiting, failed settings or sleepless nights with no results. Sometimes, despite good solar activity, nothing happens. That’s normal and accepting it helps you live the experience better. That’s also part the game.
Preparation is key
An aurora hunt can be very long and exhausting. Very, very long. Small details, like wearing truly cold-weather-appropriate clothing, bringing plenty of batteries, snacks and a hot drink, can make a huge difference to your motivation and your ability to last. Comfort isn’t a luxury, it’s what allows you to be ready when the auroras finally appear.
👉 In short, good preparation, solid technical knowledge of your gear and proper cold-weather equipment will make all the difference. The rest is a bit of luck that Nature grants you 😌 And don’t forget to look up at the sky, auroras are beautiful in photos, but they’re also an incredible phenomenon to experience with your eyes.

*This article contains affiliate links. When you click on them, the price doesn’t change for you, but I earn a small commission. This is what allows me to keep offering free content on the blog, so feel free to use them.